
Affiliate Disclosure: As an Amazon Associate I earn from qualifying purchases.
n
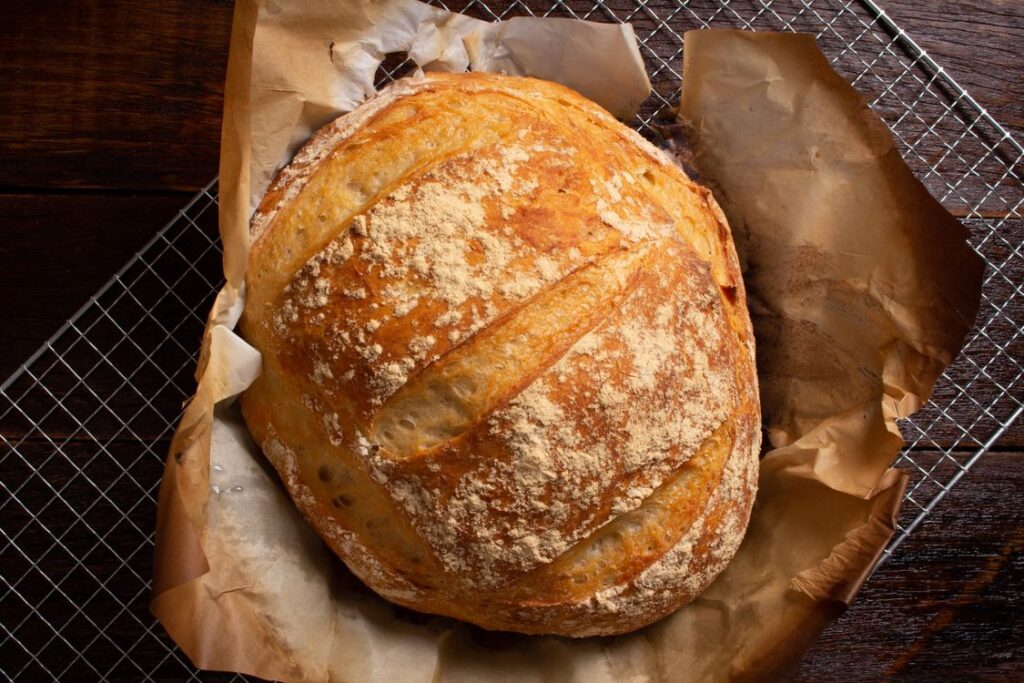
Learning to bake sourdough bread for beginners is simpler than the internet makes it look. You don’t need a culinary degree, expensive equipment, or perfect technique — you need flour, water, salt, a living starter, and a willingness to follow a timeline. This guide walks you through making your own starter from scratch, then turning it into a crusty, open-crumbed artisan loaf with a crackling crust and that signature tangy flavor.
Sourdough is bread leavened by wild yeast and bacteria instead of commercial yeast. The result is a loaf with complex flavor, a chewy crumb, and a thick caramelized crust that store-bought bread can’t imitate. Bakers have used this method for thousands of years; the pandemic-era sourdough boom simply reminded the world that it’s accessible to anyone with a kitchen. Whether your first attempt produces a showpiece or a delicious frisbee, you’ll learn something — and by loaf three or four, you’ll be baking bread that rivals your favorite bakery.
What Is Sourdough Bread? A Beginner’s Definition
Sourdough bread is bread made with a fermented mixture of flour and water — a “starter” — that captures wild yeast and lactic acid bacteria from the environment. These microorganisms eat the flour’s sugars, produce carbon dioxide (which makes the dough rise) and organic acids (which give sourdough its tang and keep it fresh longer). Unlike bread made with a packet of instant yeast, sourdough rises slowly — typically over 12 to 24 hours — and that long, cold fermentation is where the deep flavor develops.
The beauty of sourdough is that it needs only four ingredients: flour, water, salt, and starter. No preservatives, no dough conditioners, no yeast packets. The complexity comes from time and technique, not from a long ingredient list. For beginners, that means your shopping list is short — but your attention to the schedule matters.
Part 1: Make Your Sourdough Starter (7 Days)
Before you bake, you need an active starter — a jar of flour and water colonized by the wild yeast and bacteria that will leaven your bread. Making one from scratch takes about 7 days of daily feeding. The process is straightforward: you create a hospitable environment, then feed it on schedule until it’s predictably bubbly and doubling in size.
The honest shortcut: if a friend bakes sourdough, ask for a spoonful of their mature starter. It will be ready to bake with after one or two feedings. Many bakeries will also share starter. Starting from scratch is rewarding and this guide covers it fully, but there’s no shame in adopting.
What You Need for the Starter
- A clean glass jar or container (at least 1 quart), with a loose-fitting lid or cloth cover
- Whole wheat or rye flour (for the first few days — wild yeast loves whole grains)
- Unbleached all-purpose or bread flour (for ongoing feedings)
- Filtered or dechlorinated water at room temperature
- A kitchen scale (strongly recommended; a digital kitchen scale Check Price on Amazon → removes all guesswork)
- A rubber band to mark the starter’s level on the jar
The 7-Day Starter Schedule
Day 1: Mix 60g whole wheat flour with 60g water in the jar. Stir well, scrape down the sides, cover loosely, and leave at room temperature (70–75°F / 21–24°C is ideal) for 24 hours.
Day 2: You may see nothing, a few bubbles, or an odd smell — all normal. Discard half the mixture (about 60g), then add 60g unbleached all-purpose flour and 60g water. Stir, cover, rest 24 hours.
Days 3–4: Discard half and feed with 60g flour + 60g water every 24 hours. You should see increasing bubbles and a sour, yeasty aroma. If the starter doubles and then collapses, it’s hungry — that means it’s working.
Days 5–7: Switch to feeding every 12 hours (discard half, feed 60g flour + 60g water). By day 7, a healthy starter reliably doubles in 4–8 hours after feeding, is full of bubbles, and smells pleasantly tangy, like yogurt and yeast.
The Float Test: Is Your Starter Ready?
A starter is ready to bake with when it consistently doubles in volume within 4–8 hours of feeding and passes the float test. Drop a small spoonful into a glass of water: if it floats, it’s full of trapped gas and ready. If it sinks, feed it and try again in a few hours. A new starter sometimes floats early from one lucky feeding — wait until it does so predictably two days in a row before baking your first loaf.
Part 2: The Beginner Sourdough Recipe
This is a 70%-hydration recipe — the sweet spot for beginners. Hydration is the ratio of water to flour by weight; 70% gives a dough that’s easy to handle but still produces an open, airy crumb. Makes one large boule (round loaf).
Ingredients
- 500g bread flour (about 4 cups)
- 350g water, lukewarm (about 1½ cups)
- 100g active sourdough starter (about ⅓ cup, at its peak)
- 10g fine sea salt (about 1¾ teaspoons)
- Rice flour or all-purpose flour, for dusting the proofing basket
Equipment
- Large mixing bowl
- Kitchen scale
- Banneton (proofing basket) or a bowl lined with a floured tea towel
- Dutch oven with lid — a 5.5-quart enameled Dutch oven Check Price on Amazon → is the home baker’s best friend
- Parchment paper
- A lame, razor blade, or sharp serrated knife for scoring
- Bench scraper (helpful but optional)
The Beginner’s Baking Timeline
| Time | Step | What You’re Doing |
|---|---|---|
| Evening before | Feed starter | Feed so it peaks by morning |
| 8:00 AM | Mix (autolyse) | Combine flour + water; rest 30–60 min |
| 9:00 AM | Add starter + salt | Mix thoroughly until shaggy dough forms |
| 9:30 AM – 12:30 PM | Stretch and folds | 4 sets, 30 minutes apart |
| 12:30 – 2:30 PM | Bulk ferment | Rest until ~50% risen |
| 2:30 PM | Shape | Shape into tight boule, into banneton |
| 3:00 PM → next day | Cold proof | Refrigerate 12–16 hours |
| Next morning | Bake | 450°F: 20 min lid on, 20–25 min lid off |
| +1 hour | Cool | Wait before slicing — really |
Step-by-Step: Baking Your First Loaf
Step 1: Mix the dough (autolyse)
In the morning, combine the 500g flour and 350g water in a large bowl. Mix until no dry flour remains, cover, and rest 30–60 minutes. This rest — the autolyse — hydrates the flour and starts gluten development without any kneading. Then add the 100g active starter and 10g salt. Pinch and fold the dough with wet hands until everything is incorporated. It will be shaggy and rough. Cover and rest 30 minutes. This is the official start of bulk fermentation.
Step 2: Stretch and folds (build strength)
Over the next 2–3 hours, perform 4 sets of stretch-and-folds, spaced 30 minutes apart. With wet hands, grab one edge of the dough, stretch it up gently, and fold it over the center. Rotate the bowl a quarter turn and repeat 3–4 times per set — that’s one set. Cover between sets. The dough will transform from slack and sticky to smooth and elastic. Think of it as low-effort kneading spread across the afternoon.
Step 3: Finish bulk fermentation (the most important judgment call)
After the folds, let the dough rest undisturbed at room temperature until it has risen roughly 50% and feels airy, with visible bubbles on the surface and sides. At 70–75°F this typically takes 2–4 more hours after the last fold. The beginner’s golden rule: it’s better to slightly under-ferment than to over-ferment. Under-fermented dough still bakes into a decent loaf; over-fermented dough collapses into a dense pancake. When in doubt, shape earlier rather than later.
Step 4: Shape the boule
Turn the dough onto a lightly floured surface. Gently stretch it into a rough rectangle, then fold the sides in and roll it up into a ball. Flip it seam-side down and drag it toward you on the counter in small circles to build surface tension — you’ll feel the skin tighten. This tension is what helps the loaf hold its shape and rise upward instead of spreading. Place seam-side up into a well-floured banneton (rice flour resists sticking best).
Step 5: Cold proof overnight
Cover the banneton with plastic wrap or a shower cap and refrigerate for 12–16 hours. The cold slows fermentation to a crawl while flavor continues to develop — this long cold proof is the main source of sourdough’s complex tang. It’s also what makes the schedule forgiving: bake anytime within a few hours of the 12-hour mark.
Step 6: Bake in a Dutch oven
Place your Dutch oven (with its lid) in the oven and preheat to 450°F (230°C) for at least 45 minutes. Turn the cold dough out of the banneton onto parchment paper. Score the top with a confident ½-inch-deep slash — an off-center crescent is the classic beginner cut; it gives the loaf a controlled place to expand (the “ear”). Using the parchment as a sling, lower the dough into the screaming-hot Dutch oven, cover, and bake 20 minutes. Remove the lid and bake 20–25 minutes more, until deeply golden brown — darker than you think. Internal temperature should reach 205–210°F (96–99°C).
Step 7: Cool completely (the hardest step)
Transfer the loaf to a wire rack and cool for at least 1 hour, preferably 2. The crumb is still setting inside; slicing early gives you a gummy texture no matter how perfect the bake. Listen for the crackling song of the crust as it cools — that’s the sign of a great bake.
Beginner Troubleshooting Table
| Problem | Likely Cause | Fix |
|---|---|---|
| Dense, gummy crumb | Under-fermented or sliced too early | Extend bulk ferment; cool 2 full hours before slicing |
| Loaf spread flat, no oven spring | Over-fermented or weak shaping | Shape earlier; build more surface tension when shaping |
| Pale, soft crust | Oven not hot enough; lid removed too early | Preheat Dutch oven 45+ min; bake lid-off until dark brown |
| Starter won’t double | Too cold, or immature culture | Keep at 75°F+; keep feeding — some starters need 10–14 days |
| Dough sticks to banneton | Not enough flour; dough over-proofed | Dust generously with rice flour; don’t exceed 24h cold proof |
| Huge holes (tunnels) | Under-mixed or shaped with trapped air | Mix more thoroughly; degas gently during shaping |
| Sour but bland | Young starter; short cold proof | Mature starter 2+ weeks; extend cold proof to 24 hours |
Maintaining Your Starter Long-Term
A mature starter is nearly indestructible. If you bake weekly, keep it on the counter and feed it once daily. If you bake less often, store it in the fridge and feed it once a week: take it out, discard half, feed, let it sit 1–2 hours, then refrigerate. Before baking, give it 1–2 feedings at room temperature to wake it up fully. Neglected starter develops a dark liquid (hooch) on top — just stir it in or pour it off and feed; it’s not dead unless it grows mold or smells like rot.
What to Bake Next: Growing Your Skills
- Sourdough pizza dough: use your discard in a long-fermented pizza base for incredible flavor.
- Sourdough pancakes and waffles: the classic use for discard — tangy, fluffy, and waste-free.
- Whole wheat sourdough: swap 20% of the bread flour for whole wheat once you’re comfortable; it ferments faster, so watch the bulk.
- Sandwich loaf: bake the same dough in a loaf pan with a little olive oil and honey for soft everyday bread.
Storage
Store the cooled loaf cut-side down on a cutting board for up to 2 days, or in a paper bag — never plastic, which softens the crust. For longer storage, slice the whole loaf and freeze the slices; toast straight from frozen. Sourdough’s acidity keeps it fresh longer than commercial bread, typically 4–5 days at room temperature.
Frequently Asked Questions
How long does it take to make sourdough bread from start to finish?
Creating a starter takes about 7 days. Once you have an active starter, each loaf takes roughly 24 hours from mixing to cooling — but only about 30–40 minutes of that is hands-on work. The rest is waiting while fermentation does the heavy lifting.
Can I make sourdough without a Dutch oven?
Yes. Bake on a preheated baking stone or heavy sheet pan with a metal bowl inverted over the loaf for the first 20 minutes to trap steam. Alternatively, place a pan of boiling water on the oven’s bottom rack. The Dutch oven is simply the easiest way to get professional steam at home.
Why is my sourdough not sour?
Sourness comes from a mature starter and a long, cold fermentation. Young starters (under 2 weeks) produce mild bread. For more tang, use a fully mature starter, extend the cold proof to 24 hours, and use slightly less starter in the dough (75g instead of 100g), which lengthens fermentation.
Do I have to discard starter every time I feed it?
Discarding keeps the starter at a manageable size and the culture vigorous — without it, you’d be feeding cups of flour daily. The discard isn’t waste: use it in pancakes, crackers, pizza dough, or banana bread. Once your starter is mature and refrigerated, you’ll discard far less.
What’s the best flour for sourdough beginners?
Unbleached bread flour with 12–13% protein is ideal — it builds strong gluten that traps gas well. All-purpose flour works but gives a slightly denser crumb. Use whole wheat or rye for the first days of starter creation, since their extra nutrients kickstart fermentation.
Can I bake sourdough in hot weather?
Yes, but fermentation runs much faster above 78°F (26°C). In summer, use cold water in the dough, shorten bulk fermentation, and watch the dough rather than the clock. The fridge is your friend — a longer cold proof compensates for a warm kitchen.
Is sourdough bread healthier than regular bread?
Sourdough’s long fermentation partially breaks down gluten and phytic acid, which may make it easier to digest for some people and may modestly lower its glycemic impact. It’s still bread — but it’s bread with a simpler ingredient list and a fermentation process humans have used for millennia.
My schedule is unpredictable — can I pause the process?
Absolutely. After shaping, the dough can cold-proof in the fridge for up to 36 hours, giving you a wide baking window. You can also refrigerate the dough mid-bulk-ferment for up to 12 hours if life interrupts. Sourdough rewards flexibility more than rigid timing.
“Sourdough isn’t a recipe — it’s a relationship. Feed it, watch it, and it will feed you back for years.” — KitchenBrisk
